1. Set Up Your MySQL Database
-
Create a Database:
Log in to your MySQL server (using phpMyAdmin, MySQL Workbench, or the command line) and create a new database. For example, you might call it webtastic:
CREATE DATABASE webtastic;
-
Select the Database:
Use the new database:
USE webtastic;
-
phpMyadmin:
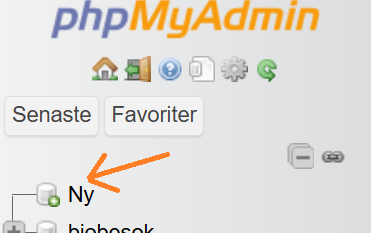
If you have phpMyadmin installed on your server you can create and access the database by pressing new in the database list. ( For me its in swedish "ny" but its a similar structure)
And then just type the name of the database you want to create.
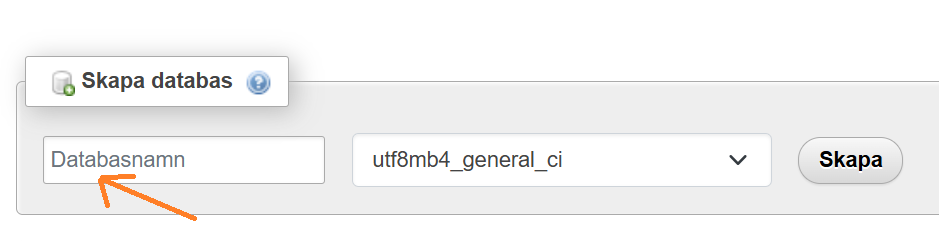
Then you click the SQL-tab for the database and insert the two SQL-statements.
2. Create the Users Table and Insert Data
-
Create a Table:
Create a table called users with columns for an auto-incrementing ID, username, password, and role. For now, you can store passwords in plain text for simplicity (though this is not recommended for production):
CREATE TABLE users (
    id INT AUTO_INCREMENT PRIMARY KEY,
    username VARCHAR(50) NOT NULL UNIQUE,
    password VARCHAR(255) NOT NULL,
    role VARCHAR(20) NOT NULL
);
-
Insert Sample Data:
Insert the sample users from your users.txt file:
INSERT INTO users (username, password, role) VALUES
    ('stefan', 'mypass', 'standarduser'),
    ('bao', 'bao', 'admin'),
    ('Janek', 'password456', 'admin'),
    ('Noel', 'noel', 'superdude');
Note: In a real-world application, you should hash passwords using functions like password_hash() in PHP.
3. Configure Your PHP Database Connection
-
Create a Connection File:
It’s a good practice to separate your database connection into its own file (e.g., db.php). For example:
<?php
// db.php
$servername = "localhost";    // your MySQL server address
$username = "your_db_username"; // your MySQL username
$password = "your_db_password"; // your MySQL password
$dbname = "webtastic";          // the database you created

// Create connection using mysqli
$conn = new mysqli($servername, $username, $password, $dbname);

// Check connection
if ($conn->connect_error) {
    die("Connection failed: " . $conn->connect_error);
}
?>
Replace the placeholder values with your actual database credentials.
4. Update the Login Script (login.php) to Use MySQL
-
Include the Connection File:
At the top of your login.php, include the connection file.
-
Replace File Reading With a Database Query:
Instead of reading from users.txt, query the database using prepared statements to prevent SQL injection. Here’s an updated version of your login logic:
<?php
session_start();
require_once 'db.php'; // include the database connection

// Check if login form was submitted
if(isset($_POST['loginname']) && isset($_POST['password'])) {
    $username = $_POST['loginname'];
    $password = $_POST['password'];

    // Prepare a statement to select user data
    $stmt = $conn->prepare("SELECT password, role FROM users WHERE username = ?");
    $stmt->bind_param("s", $username);
    $stmt->execute();
    $result = $stmt->get_result();

    if($result->num_rows === 1) {
        $row = $result->fetch_assoc();

        // For plain text passwords (not secure in production)
        if($password === $row['password']) {
            $_SESSION['loggedin'] = true;
            $_SESSION['role'] = $row['role'];
            $_SESSION['username'] = $username;
        } else {
            header('Location: hell.html');
            exit;
        }
    } else {
        header('Location: hell.html');
        exit;
    }
    $stmt->close();
    $conn->close();
}

// Ensure the user is logged in before granting access
if(!isset($_SESSION['loggedin']) || $_SESSION['loggedin'] !== true) {
    header('Location: hell.html');
    exit;
}
?>
<!DOCTYPE html>
<html>
    <head>
        <title>Webtastic</title>
        <link rel="stylesheet" type="text/css" href="style.css">
    </head>
    <body class="home">
        <h1>Welcome to Webtastic</h1>
        <p>Here you can find all the information you need to know about webtastic.</p>
        <p>Click <a href="secretpage.php">here</a> to go to the hive of knowledge.</p>
        <?php require_once 'logout_button.php'; ?>
    </body>
</html>
Explanation:
- Prepared Statements:
Using $conn->prepare() and binding parameters helps prevent SQL injection.
- Session Management:
If the credentials match, you set session variables and continue; otherwise, the user is redirected to an error page.
5. Test and Debug
- Upload Your Files:
Place index.html, login.php, db.php, and any other necessary files on your web server.
- Verify Database Connection:
Ensure your MySQL server is running and the credentials in db.php are correct.
- Perform a Login Test:
Try logging in using the sample credentials. If there’s a mismatch, check your connection and error logs.
- Error Handling:
Consider adding error messages or logging to help diagnose issues during development.
6. Enhance Security (Optional but Recommended)
- Password Hashing:
Instead of storing plain text passwords, use PHP’s built-in functions:
- When Inserting Users: Use
password_hash().$hashedPassword = password_hash($password, PASSWORD_DEFAULT);
- When Verifying Login: Use
password_verify().if(password_verify($password, $row['password'])) {
// Password is correct.
}
- Additional Security Measures:
Consider implementing further measures such as SSL/TLS, secure session management, and user input validation.
Final Thoughts
By following these steps, you and your students will have migrated your login functionality from a simple text file to a robust MySQL–backed authentication system. This not only makes the application more scalable but also provides a foundation for better security practices.
.png)